- Create strong and long passcodes
- 2FA is the way
- Regularly update iOS
- Disable microphone and camera access for some apps
- Turn off location tracking
- VPN an excellent add-on
- Wrap up
Have you heard of a little something called “nomophobia?” Well, you should probably add it to your dictionary because it’s something we’ve all experienced at some point: smartphone separation anxiety. The feeling of losing your iPhone or forgetting it at home can be really frustrating and stressful because these devices have become very personal to us. In fact, scientists from the City University of Hong Kong and the Sungkyunkwan University in Seoul say that smartphones are now “an extension of ourselves.”
There’s no arguing with that point because we use our iPhones to do everything: set alarms, social networking (WhatsApp, Instagram, Facebook…), listen to music, take selfies and much more. That is why it is critical to protect our data from any possible threat. To do that, there are 9 iPhone settings that improve your privacy and security.
Content Overview
- iPhone Settings
- Make Stronger, Longer Passcodes
- Use Two-Factor Authentication
- Always Update iOS
- Enable USB Restricted Mode
- Turn Off Microphone, Camera Access for Certain Apps
- Use Safari
- Disable Location Tracking (For Specific Apps or Entirely)
- Disable iPhone’s Location Tracking
- Install Apps That Encrypt Your Data
- How to Install ExpressVPN on Your iPhone
- Avoid Free VPNs
- ExpressVPN: Your Number One Choice
- Worried About Your Privacy and Security? You Know What To Do
iPhone Settings
Have you ever checked out the privacy section in your settings? Well, you’re in for a treat. If you dig deep into it, you’ll find lots of intriguing things, including some alarming invasions of privacy. The apps installed on your device, even your iPhone itself, monitor your every move.
If this creeps you out, you need to take several measures in your iPhone settings to prevent it. Well, nine to be exact.
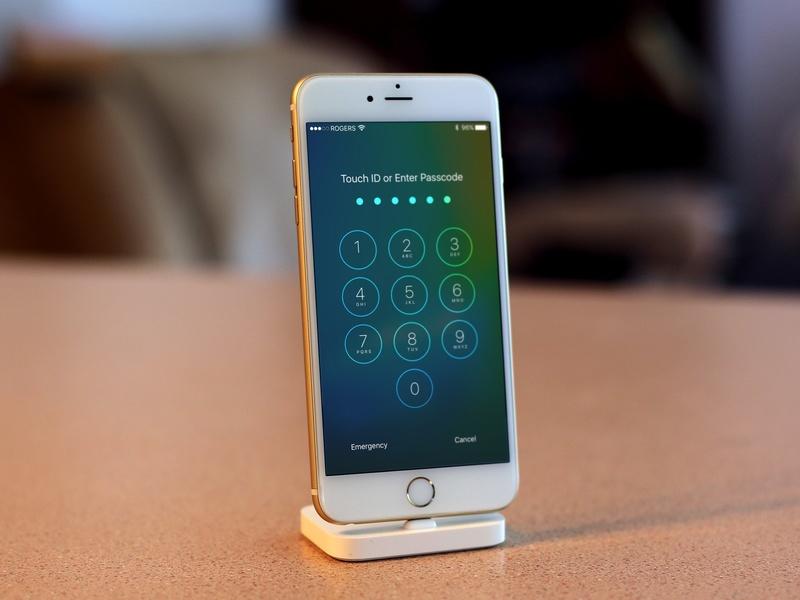
Make Stronger, Longer Passcodes
You can protect your iPhone using a passcode so that no one can just pick up your device and start using it immediately. At first, iOS introduced a four-digit code by default, which can be easy to crack. But now, your passcode must contain six digits by default, with the option to expand it even longer.
This means you’ll have a minimum of one million possible combinations, which vastly expands the effort required to crack a four-digit passcode. Users can even create a more complex alphanumeric password with a combination of letters, numbers, and special characters.
I think the best way to match between security and quick accessibility is to use a long passcode. But try not to be too predictable. In other words, please don’t use 123456 or 888888 as a lock-screen code.
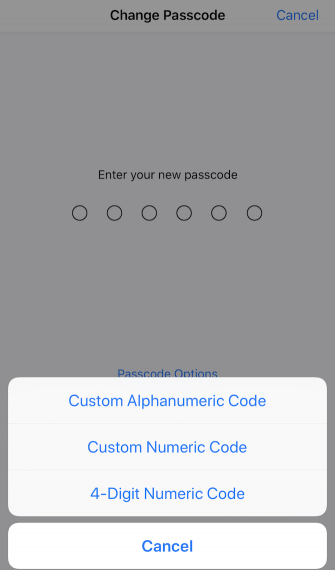
To change your passcode, here’s what you have to do:
- Go to ‘Settings’ > ‘Touch ID & Passcode’ (or ‘Face ID & Passcode’ for iPhone X users).

- Select ‘Change Passcode‘ > ‘Passcode Options.’ This will bring up
‘Custom Numeric Code‘ and ‘Custom Alphanumeric Code.’ - Enter your new and improved code and verify it.

Use Two-Factor Authentication
You don’t need me to tell you that cyber attacks and hacks are on the rise. In fact, statistics from the 2019 SonicWall Cyber Threat Report showed a frightening 217.5% increase in IoT attacks in 2018. And that’s not all. There was also a 56% surge in web app attacks, and an 11% year-over-year hike in ransomware attacks.
Therefore, you must apply every security measure you can because there’s no such thing as too much safety. And one of those measures is the two-factor authentication, or 2FA. Enabling this feature will provide you with an extra piece of security because you’ll have to provide your password and a unique code to access your accounts. You’ll receive this code via text message.
As a result, even if someone else gets your password, they’ll still need the code to break into your account.
Apple even introduced a little something called ‘security code autofill‘ to iOS 12. This option will automatically take the code from your text message as soon as you receive it and autofill it into the security field of the service you want to use. So no more going back and forth… No more copy-pasting.
Learn how to turn on 2FA below:
Step 1
If you’re using iOS 10.3 or later, go to iPhone Settings > Password & Security. For those with an earlier version, click Settings > iCloud > Apple ID > Password & Security.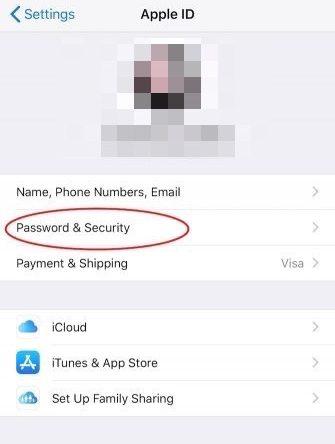
Step 2
Press ‘Turn On Two-Factor Authentication‘ then ‘Continue.’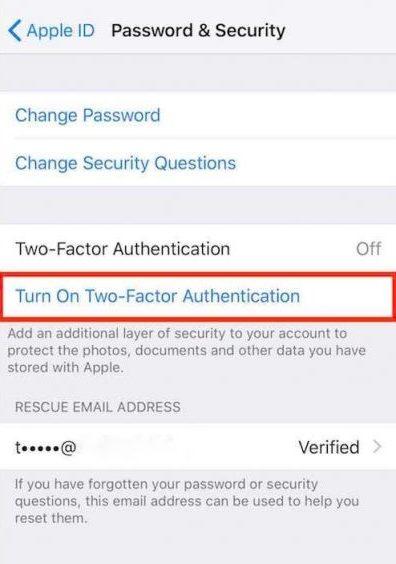
Step 3
Enter and verify your phone number so that Apple can send you the verification code.
Step 4
You’ll then receive a code via text message (you can choose via phone call) from the company. Input the number into the empty field to activate 2FA.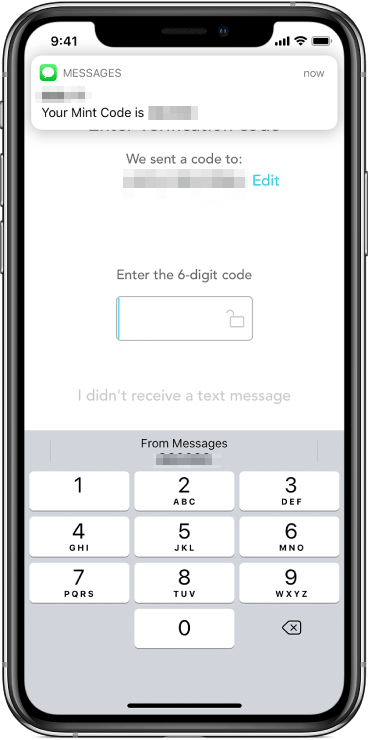
Trusted Devices
A trusted device is an iPhone, iPad, or iPod touch with iOS 9 and later, or a Mac with OS X El Capitan and later that you’ve already signed in to using 2FA. These devices act as security authentication tools because they allow you to confirm your identity by entering the verification code you received from Apple when you sign in.
Also, you have to verify at least one trusted phone number to enable two-factor authentication. You can use this trusted number to receive verification codes via text message or automated phone call.
How to Add a Trusted Device
You can view and manage a list of your trusted devices in the Devices section of your Apple ID account page. 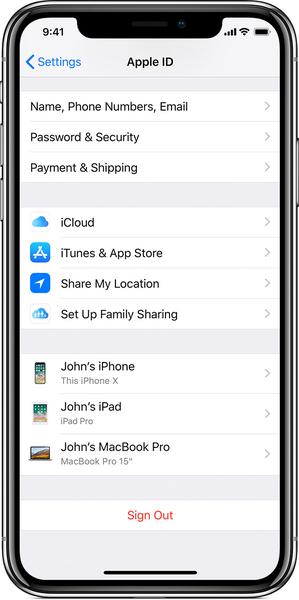
To add a new trusted device, all you have to do is log in to iCloud and activate the Find My iPhone feature. Once you turn it on, the device you’re using is automatically added to your list of trusted devices. Then, all you have to do is verify it.
You can also use your Apple ID to to change your trusted devices.
Step 1: Log into iCloud and enable Find My iPhone using the device you want to add. Go to iPhone Settings > iCloud 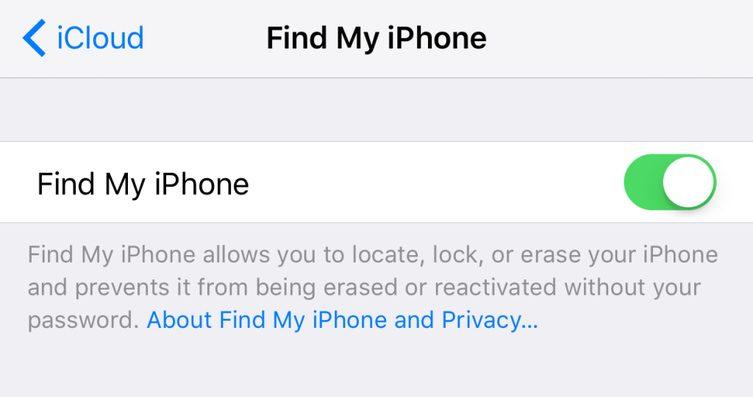
Step 2: Using Safari, sign in to Apple ID > Password & Security > Add or Remove Trusted Devices.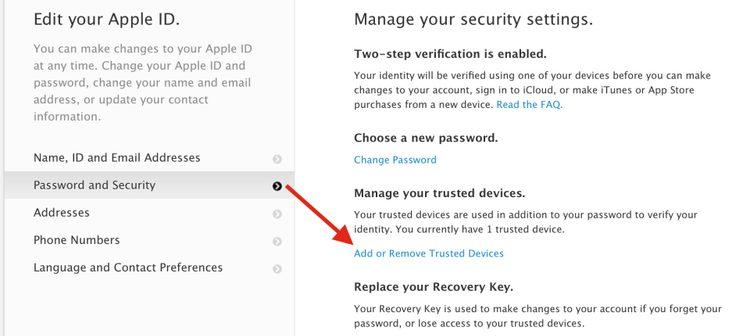
Step 3: Click on the Verify link next to the device that you want to enable as a trusted device.
Step 4: Then, a six-digit verification code will appear on your screen.
Step 5: Type the code into the box that appears inside the Safari browser then click Verify Device.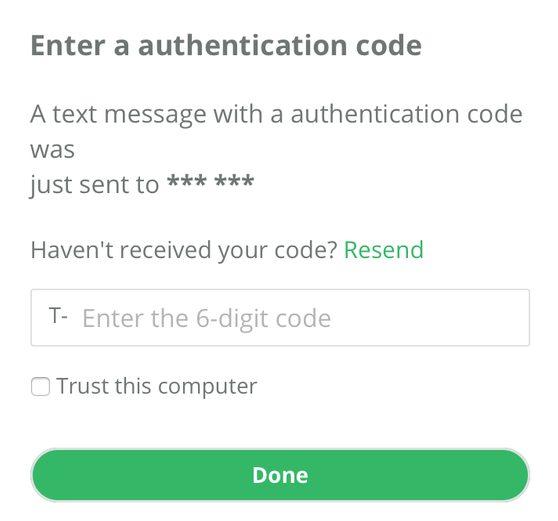
How to Remove a Trusted Device
You can also remove a trusted device from your list. Once you sign out of iCloud or disable Find My iPhone, the device you’re using is no longer verified. However, it will still appear on your list of potential trusted devices.
To remove it, all you have to do is:
- Log in to Apple ID.
- Tap the device to see its details, then click Remove From Account.
- Review the message that appears, then tap again to confirm that you want to remove the device.
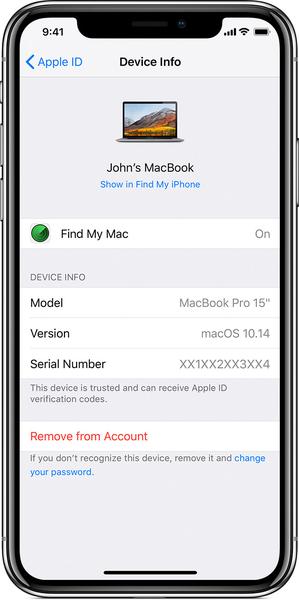
Please note that your device might reappear on your account page if you’re still signed in with your Apple ID. To permanently delete it, you have to sign out of iCloud, iTunes, iMessage, FaceTime, and Game Center, or erase the device.
Always Update iOS
A lot of users avoid making too many updates to their iPhone or wait for a major software update to install it. However, you should always have the most recent version of iOS on your phone. Why? Because if there’s any weakness in your current software, Apple will fix it in the next update.
Hackers can exploit these vulnerabilities and infect your device with malware or steal your personal data.
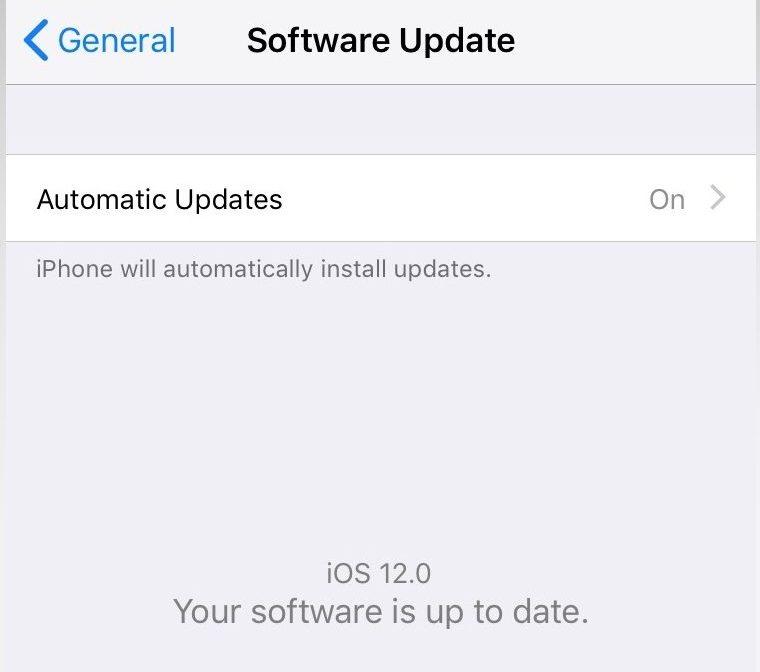
Therefore, I recommend you turn on ‘Automatic Updates‘ and allow iOS to update your device in the background. It will save you time and effort.
And if you prefer to do it manually, you can install software updates over-the-air (OTA) or on your computer through iTunes.
For OTA Updates:
- Go to iPhone Settings > General > Software Update.
- Tap Download and Install if there’s an update available on display. If you’re using the current version, you’ll see a Your software is up to date message.
- Once the installation is complete, your iPhone will restart automatically.
For iTunes Updates:
- Plug your iPhone into a trusted computer (you may see a prompt if it’s a new computer).
- Open iTunes then select your device.
- Press Summary > Check for Update
- If your software is up-to-date, iTunes will tell you that you’re using the latest version. If a new update is available, click Download and Update.
Enable USB Restricted Mode
This brilliant new feature from Apple prevents any accessories from connecting to your device when it has been locked for an hour or more. That includes USBs, headphones, cables, and more.
The company introduced this option after US government agencies started using tools like Cellbrite and GrayShift to bypass your code and access your phone. These services allow agents to enter an unlimited number of passcodes until they finally crack it.
However, USB Restricted Mode requires you to unlock your iPhone with Face ID, Touch ID, or your passcode whenever you connect to a USB device. This practically ends all attempts of brute forcing techniques to open your iPhone.
To activate this feature, simply go to Settings > Touch ID & Passcode (or Face ID and Passcode) and type in your passcode. Then, scroll down and ensure that USB Accessories are turned off.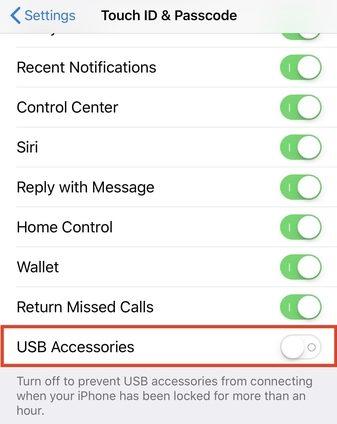
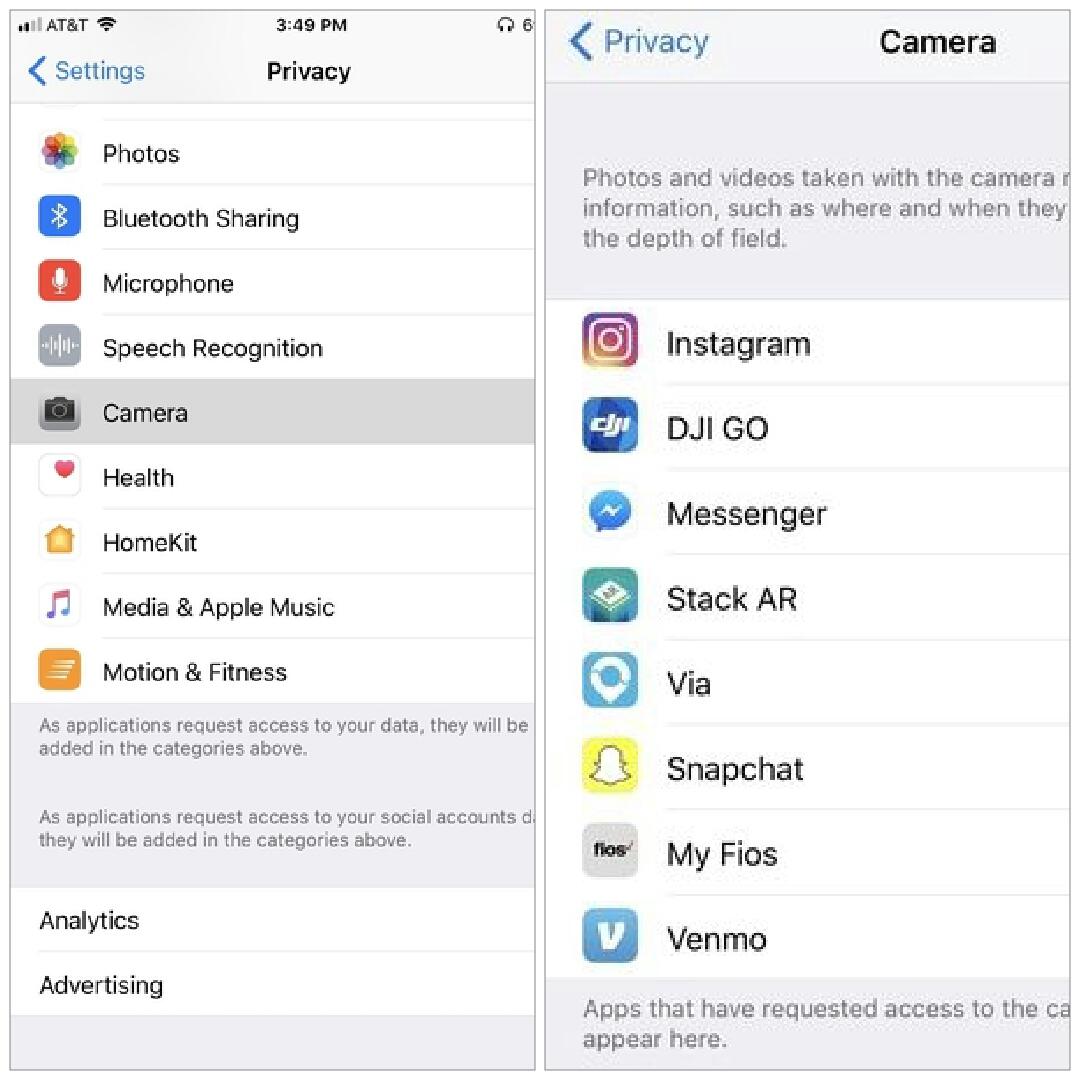
Turn Off Microphone, Camera Access for Certain Apps
Several apps must have access to your camera and microphone in order to function properly. I mean how can you go live on Instagram, Snapchat, or Facebook for example if you disable these options. However, other apps don’t need this level of freedom.
Therefore, it’s better to turn off your camera and microphone for any questionable applications that have no business in snooping on you.
- To disable your microphone, just go to Settings > Privacy > Microphone and tap on the toggle next to the apps you want to deactivate.
- To disable your camera, just go to Settings > Privacy > Camera and tap on the toggle next to the apps you want to deactivate.

Use Safari
Safari is iOS’s built-in web browser. I recommend it because it offers privacy features such as tracking prevention that other web browsers like Google Chrome don’t provide. This will prevent advertisers from tracking your online activity.
Furthermore, it stops Facebook and Google from monitoring your browsing history via like and share buttons. Also, Safari allows you to manage which websites can access your camera and microphone.
Apple also allows you to switch to another search engine, including DuckDuckGo. This service does not collect or share personal data about you, which is why I recommend it. It also prevents “search leakage.”
To change your search engine, simply Go to iPhone Settings > Safari > Search Engine and tap DuckDuckGo or the other options available (Google, Yahoo, Bing).
Disable Location Tracking (For Specific Apps or Entirely)
Several apps track our location to give accurate information and updates about the weather, traffic, or directions. However, you don’t need location tracking turned on all the time, especially for every application.
Now, Apple asks upon installation if you want to enable this feature at all times, if you only want it switched on when using the app, or if you never want to turn it on. I personally think the best option is to activate location tracking when you’re using the app, so that you can take full advantage of it.
Nonetheless, your decision isn’t written in stone, and you can change it at any time.
- Just go to iPhone Settings > Privacy > Location Services
- Here you’ll find all the apps that require your location. Select the one you want then choose your preferred option: Never, While Using the App, or Always.
I Don’t Want Anyone to Track My Location
You can also turn off location tracking completely so that your apps can never know where you are at any time. But keep in mind that Apple Maps won’t give you accurate readings if you do so.
The process is similar to the above. All you have to do is tap Settings > Privacy > Location Services. Then untoggle Location Services at the top.
Disable iPhone’s Location Tracking
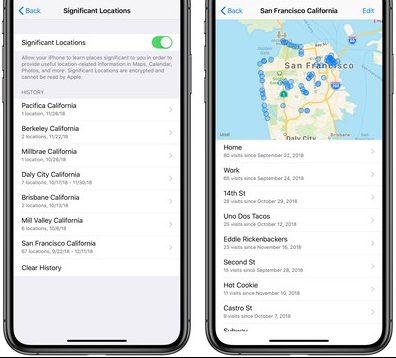
Don’t think you’re safe just yet. Your apps aren’t the only ones who track your location, your iPhone does the same as well. It logs the “significant locations” you visit the most to provide suggestions when you’re using Siri or other features.
However, this data is encrypted so no one can see it. Nonetheless, you might feel more secure if you turn it off.
Step 1
You have to click Settings > Privacy > Location Services, just like in the previous setting.
Step 2
Scroll down and tap System Services. It should be at the bottom. 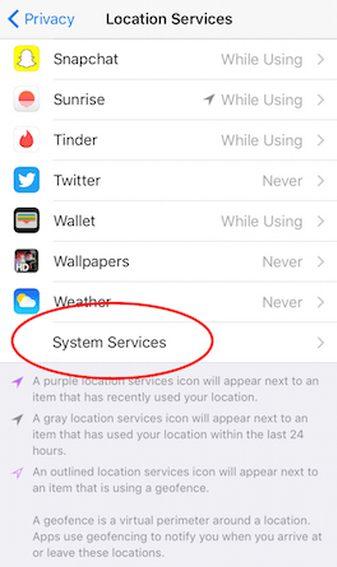
Step 3
Press Significant Locations. Your phone will then ask you to enter your passcode or activate Face ID or Touch ID.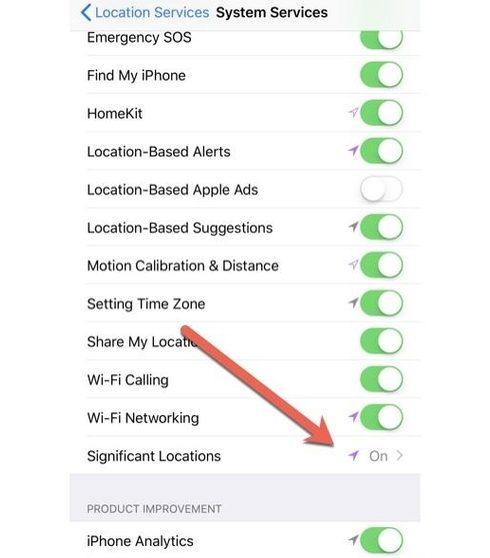
Step 4
- You can completely disable the feature by untoggling Significant Locations at the top.
- Or, you can delete entries by pressing each one separately. Then, press Edit at the top of the page to delete each entry individually.
Install Apps That Encrypt Your Data
Alright, so we’ve covered the most important built-in iPhone settings to maintain your privacy and security. But it’s also critical to protect your data whenever you go online using your phone. Therefore, it’s always better to install a VPN app to secure and encrypt your traffic.
As you may know, your sensitive information is vulnerable to theft if you visit suspicious websites or connect to unsafe connections like public WiFi. However, you can put your mind at ease with a virtual private network (VPN).
Protect Your Device With a VPN
If you’re looking for online security and privacy, look no further than a VPN. This tool has become indispensable over the past few years due to the benefits it offers, such as:
- Total privacy: VPNs encrypt your online data and traffic so that no parties can monitor it. That includes your internet service provider, even government agencies.
- Complete security: You can connect to any network you’d like without fearing any data breaches or thefts. All your sensitive information will stay protected from the prying eyes of hackers.
- Bypassing geo-blocks: VPNs reroute your internet traffic to foreign servers of your choice. They’ll also grant you a new IP address from the region that you selected to make it appear as if you were physically there. As a result, you’ll have access to any restricted website you want.
- Avoiding censorship: You could really use a VPN if you live in places like China or Syria where internet freedom is limited. All you have to do is connect to a foreign server and unblock popular websites like YouTube, Facebook, and Instagram. No one will ever know.
Of course, there are plenty of VPN services available on your app store, which is why it’s very important to choose the right one. I recommend you install the one I’m using: ExpressVPN.
How to Install ExpressVPN on Your iPhone
First, you have to subscribe to the service if don’t have an account yet. You can do so on their website or by downloading the app from the App Store.
Step 1
To download ExpressVPN for iOS, tap the App Store icon on your home screen.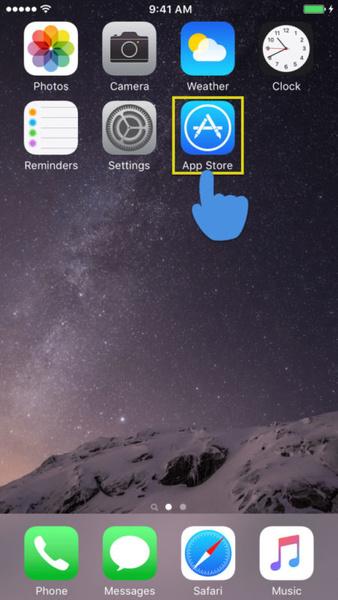
Step 2
In the Search field, type ExpressVPN and select the autofill result.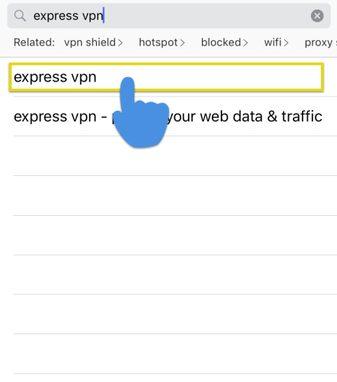
Step 3
Click Get then Download. You need to have the iOS 9 or above to download and install the app. 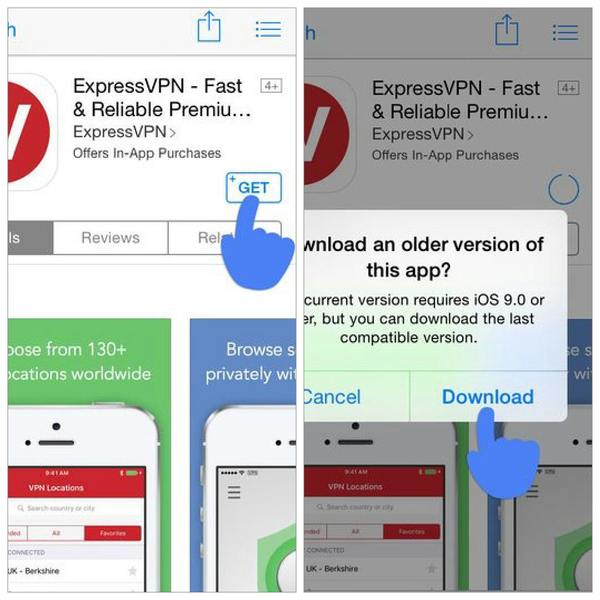
Step 4
Once Download is complete, tap the ExpressVPN icon on your home screen to open the app. Then, press Sign In to access your account.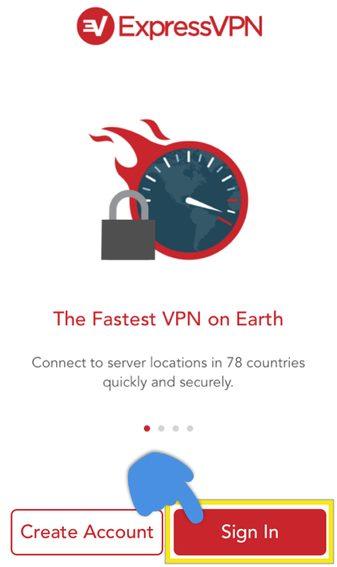
Step 5
Enter your email address and activation code, then hit Sign In.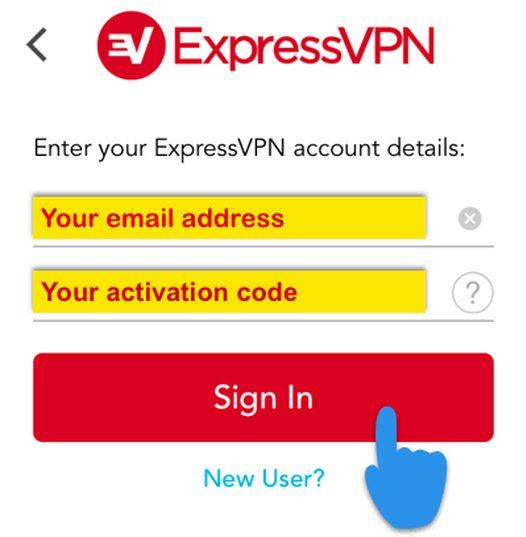
Step 5
When you sign in for the first time, you’ll have to set up ExpressVPN. Just tap Install to continue.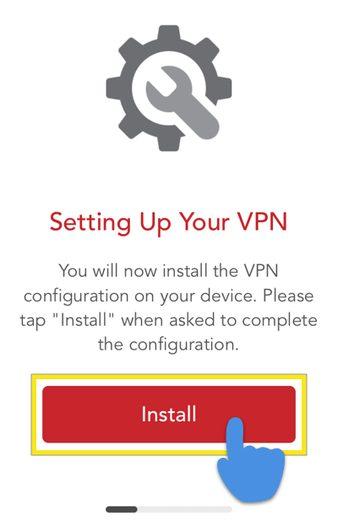
Step 6
To begin installing your profile, Tap Install. You’ll then need to enter your phone’s passcode.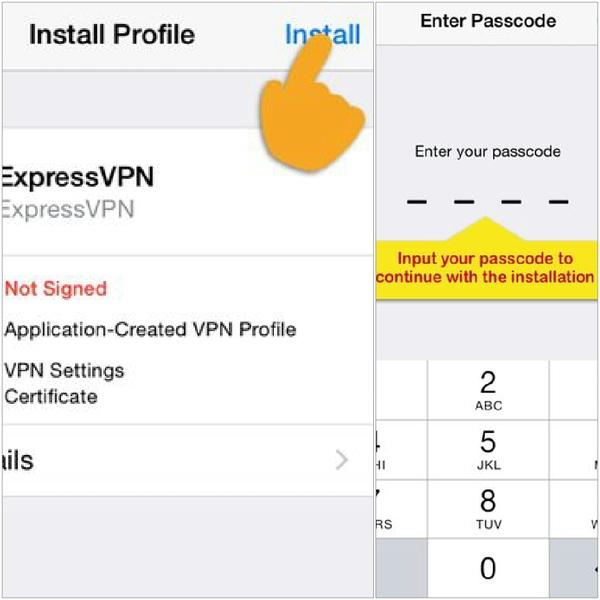
Step 7
Read the installation warning and tap Install. Then, click Done to complete the process.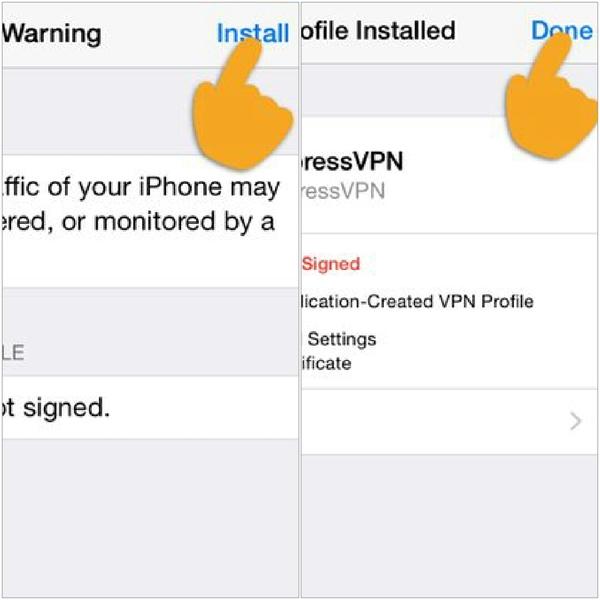
Step 8
The app will ask you if you’d like to share anonymous analytics to help make ExpressVPN faster and more reliable. Tap Allow if you’d like to activate this feature.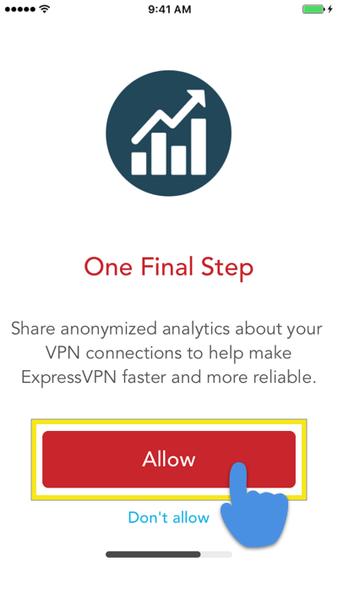
Step 9
Installation complete! If this is your first time using ExpressVPN, you can Take a Tour for a quick walkthrough on using the app. You can also skip the tour and come back to it later.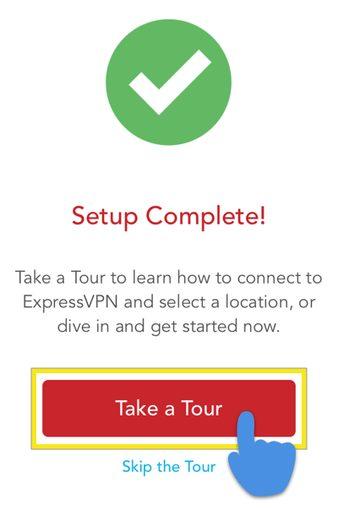
Avoid Free VPNs
As I mentioned earlier, there are a lot of VPN providers nowadays. However, choosing the right one can be quite tricky, especially if you’re a beginner.
My advice to you is to always stay away from free services like Hola VPN, Betternet VPN, and CrossVPN because they don’t offer the three most crucial things that VPNs should have: security, privacy, and speed.
First of all, free brands usually don’t encrypt your traffic. And even if they do, they mostly use weak protocols that are easy to crack. This means that anyone can monitor or see your online activity.
Second, they don’t respect your privacy. In fact, they’ll most likely log your search history and sell it to third parties like advertisers.
And last but not least, they have a small server network that covers very few countries all over the world. Furthermore, due to the large number of users, you’ll suffer from slow speeds, which isn’t ideal if you’re streaming your favorite shows.
Therefore, you should always stick to paid services like ExpressVPN.
ExpressVPN: Your Number One Choice
You might find ExpressVPN a bit expensive, but trust me when I tell you that it’s worth it. Feast your eyes at all the features this service provides and you’ll be speeding to get it.
Vast Server Network
The company has more than 3,000 servers spread across 94 countries, making it one of the largest networks in the business. You can connect to any of those servers no matter where you are and unlock any website you’d like.
Strong Security and Privacy Features
One of the most important characteristics that a VPN should have is strong security features. Without it, any service is deemed untrustworthy.
Fortunately, ExpressVPN doesn’t come short when it comes to security. It uses the military-grade AES 256-bit encryption, which ensures that no one can snoop on you when you’re online. Furthermore, it provides split tunneling, DNS leak protection, and a kill switch.
As for privacy, the company has a strict no-logging policy:
“We never keep traffic logs, and we also don’t keep any logs that might enable someone to match an IP and timestamp back to a user. We work entirely on the basis of shared IPs, meaning that a single IP does not track back to an individual user.”
ExpressVPN website
Blazing Speeds
For many brands out there, strong encryption jeopardizes speed. Well, not ExpressVPN. Despite using the strongest encryption protocol there is, it still offers one of the fastest speed rates in the business. This makes it perfect for streaming movies, series, live sports, and any other program, even in full HD.
High Compatibility
You can download the ExpressVPN app on every popular device, platform, or operating system. It has apps for Windows, Mac, Android, Linux, and iOS, as well as extensions for Chrome, Firefox, and Safari.
More, More, More
Do you think that’s the end of that? I’m just getting warmed up.
With ExpressVPN, you can also benefit from these features:
- Full Netflix compatibility.
- Torrenting and P2P allowance.
- 30-day money-back guarantee.
- Up to three simultaneous connections.
- Optimized apps for iPhone, iPad, and Mac.
Worried About Your Privacy and Security? You Know What To Do
Are you excited about your new iPhone? Well, I feel the same way whenever I upgrade to the latest model. But what most people fail to realize is that your device, with all its apps, can be a recipe for disaster, at least in terms of privacy and security.
Therefore, if you worry about those things as much as I do, use these 9 iPhone settings tips to boost your security and privacy when you’re using your phone. And if you install ExpressVPN, you’ll be adding an extra layer of protection that will make you immune to any possible threat.